Painting a room is all about having the right tools for the job. These 6 items are my tried and true painting tools that I reach for every time I paint a room or project.
Want more home decor tips? Learn how to save money shopping for home decor, how to style bookshelves, and how to decorate your home without breaking the bank.
Over the past few years, I’ve painted my fair share of rooms.
You see, when we moved into our townhome, all of the walls and the ceilings were “Antique White.” Or, what I would like to call “yellow.”
See for yourself…


This was not what I was expecting when I first heard that everything in our new home would be painted a version of “white.” I thought we would be starting with a blank slate.
That bad paint threw me off at first. I walked into our bright white kitchen and immediately regretting my choice of cabinet color. I doubted that I made the right decision and was so upset!

But, the problem wasn’t my design choices. It wasn’t the cabinet color or the countertops. Nope…it was the paint.
Thankfully, paint can easily be changed. It’s one of those projects that you can do in a weekend and it’s not even that expensive.
After we moved into our home, we got to work right away painting like crazy!


Painting a room can seem like a daunting task. But really, it’s not very difficult at all. Actually, if you pop in your headphones and get to work, it can kind of be relaxing. It’s one of those mindless activities!

The key to making painting as easy as possible is having the right tools. As I’ve painted more and more rooms (and ceilings and trim), I’ve figured out what my go-to tools are.
They are the items I reach for every time I start a new painting project.
My 6 Must-Have Painting Tools
This post contains affiliate links for your convenience. For more information, see my disclosures here.
Angled Paint Brush
This short angled paint brush is my go-to tool for edging. It’s perfect for getting into tight spots and the short handle makes it easy to hold.
When I first painted our kitchen, I taped everything off and then used a brush to edge. When the paint was dry, I peeled off the tape and I had a mess! The tape didn’t really help at all and it took so much time to set up. I ended up having to fix all of the trim that I got paint on.
Since then, I’ve never used painters tape. All I do is use this brush to edge or “cut in.” It takes a little bit of practice but I think it’s so much easier and quicker than having to tape everything.
Rollers
We keep two different types of rollers on hand in our home. The first is a standard size paint roller. The second is a smaller foam roller.
The standard paint roller is for painting the walls and the ceilings.
The smaller foam roller is for painting trim or smaller areas.
Trays and Liners
We have maybe two paint trays in our home. You need paint trays for rolling paint.
But we also keep about 10 tray liners in our home at all times. That’s because I hate cleaning up paint trays. I would MUCH rather just use a liner and throw it away when I’m done. Grab a few of these and you will thank me when it’s time for cleanup.
Handy Paint Pail and Liners
When you are cutting in, edging, or just getting into a smaller area to paint, carrying the paint can around isn’t really practical or helpful.
We love love LOVE our Handy Paint Pail. It’s super easy to carry around when you are painting — it even had a hand grip. The most ingenious part about it is actually pretty simple. There is a magnet on the inside wall of the pail that will hold your paintbrush to the side. So, no more fishing for your brush is a bucket of paint or laying your brush down and getting paint everywhere. This thing is so helpful!
It also has liners that we like to have in stock in our home at all times. Because again, cleanup is a pain. It’s much easier to use a liner and then just throw it away.
Kraft Paper and Tape
While I don’t find it necessary to tarp off your entire room when painting, I do always keep a roll of kraft paper and some painters tape on hand. Sometimes when we are working on smaller paint projects, it’s nice to be able to roll out some kraft paper and make a workspace for yourself. That way you don’t have to worry about getting paint everywhere.
I also like to sometimes have a section of kraft paper underneath my paint tray when I’m painting a room for any stray paint dripping.
And while I don’t tape the trim in the room when I’m painting, I still like to keep painters tape on hand in case I need to cover up something in the room like hardware or a light fixture. It’s also really handy for taping down that kraft paper so it doesn’t move or blow away if you happen to be painting outside or in a garage.
Paint Sprayer
My latest favorite painting tool is actually this paint sprayer. It’s perfect for smaller projects or for painting things that have a lot of detail and would be difficult to use a roller on. This paint sprayer is kind of addictive to use. And watching the paint go on evenly is kind of satisfying.
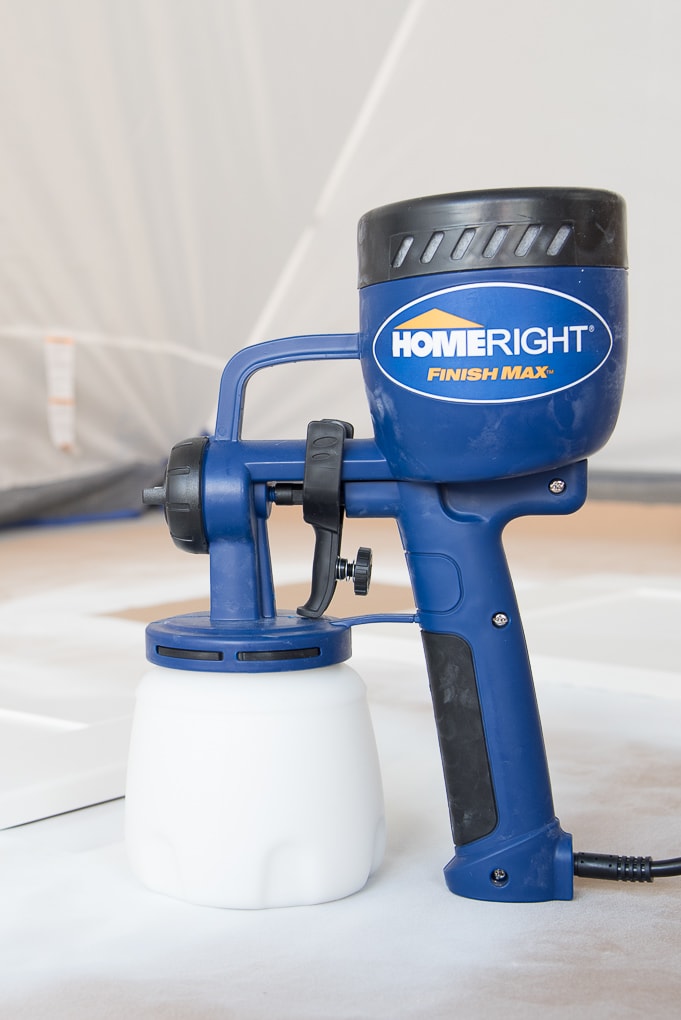
The paint sprayer is perfect for getting a smooth, even finish to your painting project. I would highly recommend it if you’re ever painting cabinet doors, shutters, or other items in large quantities.
The only downside is, of course, the cleanup part. The paint sprayer does require a lot more attention to detail when cleaning in order to keep it in proper working order. But in my opinion, the sprayer is totally worth it!
So there you have it. My 6 must-have painting tools. I never start a painting project without having these items on hand.
Painting is actually an easy DIY project, especially when you have the right tools. The only hard part is when it’s time to clean up!

You can follow along as we transform (a section of ) our basement into my modern and bright creative home office via the links below:
Planning a Modern and Bright Creative Home Office {One Room Challenge Week 1}
How to Build a Desk using IKEA SEKTION Cabinets {One Room Challenge Week 2}
The Best Removable Wallpaper Patterns
How to Install Removable Wallpaper {One Room Challenge Week 3}
6 Must-Have Painting Tools (You’re Here)
How to Paint IKEA SEKTION Cabinets {One Room Challenge Week 4}
DIY Bookshelves for a Built-In Desk {One Room Challenge Week 5}
Modern and Bright Creative Home Office Reveal {One Room Challenge Week 6}





A paint sprayer is my fav. I always use it not only for small projects but also for the big ones.
Awesome Painting Tools Christene. thanks for sharing. Really helpful post.
Hi Christene,
I paint professionally and while snooping around on the web to see what people are talking about when it comes to painting and I came across your blog.
You’re right, painting can certainly be one of those mindless jobs you do and it really isn’t that hard when you know what you’re doing and have the patience for it. The only thing that’s difficult is the prep and clean up. Painting by itself is a breeze.
You certainly hit the core points when it comes to the tools you need for the job, but have you considered recommending specific products? Like a Wooster Professional 2 & 1/2 inch Angled Sash brush?
That would be helpful to most homeowners looking for quality products. Just thought I’d put it out there.
Other than that, I thought it was a good post :).
Hi! Thanks for the tutorial- want to take this project on next. Did you do more than one coat throughout, or just the one?
Great collection of ideas! I really love the Christmas lights. I think that’s just what my back patio needs
Good post. Love to read
Great blog post on home improvement! Your suggestions for, tiling, and flooring are practical and cost-effective. I also agree that upgrading appliances and fixtures for energy efficiency is important, and adding personal touches like decor can make a big difference. Thanks for sharing these tips and ideas!
Best regards,
Norman knights
thank you so much for this perfect article i like it ..