
This post contains affiliate links for your convenience. For more information, see my disclosures here.
I have a confession to make – our kitchen is pretty disorganized right now. When we unpacked from the move, almost all of the cabinets were quickly filled without any time to organize. We decided just to put things where we initially thought they should go and live with the setup for a while. Then later, we could re-evaluate how we want the spaces to function. Well, the time has finally come to start rethinking the spaces and begin organizing the chaos. I am so excited to get started and make the kitchen into the well organized and efficient space I have dreamed of!
The first place that I decided to evaluate was the cabinet under the sink. This cabinet is one of our most utilized storage spaces in the kitchen. It is a central space where we store items for keeping the kitchen clean and doing the dishes. Since it’s a fairly deep cabinet, it can really hold a lot of things.
I never really gave a lot of thought about how this cabinet was organized before, but as more things started to accumulate, I began to get frustrated with how inefficient it was. Today I’m going to share with you some simple steps that helped me to organize this area in my kitchen and make it into a functional space with a purpose.
Let’s get started!
Step 1: Clear the Space
The first thing that I did was empty out the entire cabinet. By clearing out all of the items, I was able to get a good idea of the space I have to work with and start to think about how to want to space to function.
Step 2: Give the Space a Purpose
Now that I had a blank canvas, I was able to rethink what I wanted this space to be used for. Since this is the main space for our kitchen cleaning, I determined that the purpose of this cabinet would be “Kitchen Cleaning and Maintenance.”
Every space in your home should have a purpose. This is such an important concept in home organizing because when a space doesn’t have a purpose, it often becomes cluttered and disorganized. By having different purposes for the spaces in your home, you can get a better idea of where certain items belong. Then, every item will have a defined place in your home.
Step 3: Evaluate the Items
Once I had all of the items out of the space, I was able to look at everything and sort what had accumulated. I made two piles – one for items that fit the purpose of the space, and one for items that didn’t. I took all of the items that no longer fit and moved them out of my project area. Then I was left with only the items that fit into the new purpose of the cabinet.
When you are tackling an organizational project, you may be tempted to try and fit everything that you took out of the space back into the re-organized space. Remember, just because all the items physically fit into the space doesn’t mean that they all belong there. You need to evaluate each item against the new purpose of the space.
Step 4: Make it Pretty
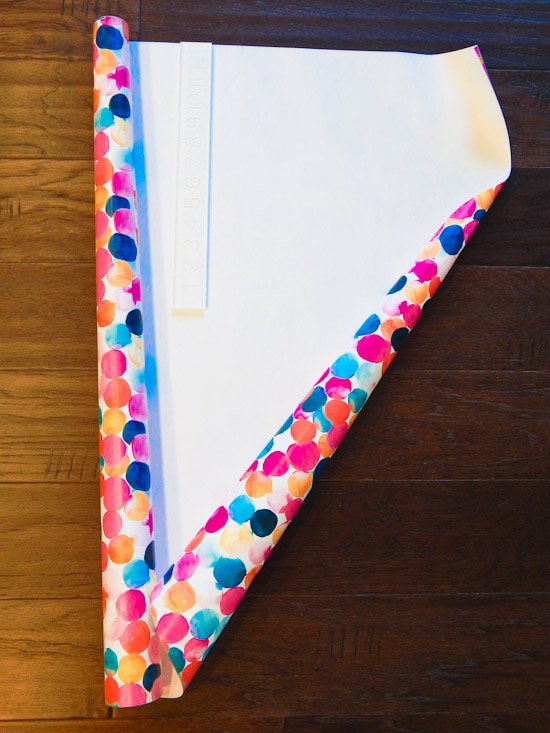
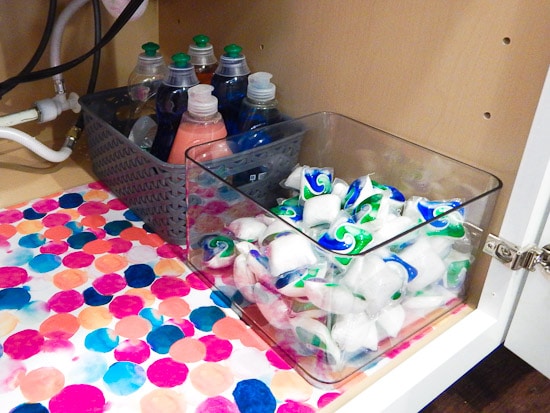
The next step is where you can get creative with your space and make it pretty! I brought out some colorful wrapping paper that I already had on hand and used it to line the bottom of the cabinet. I measured the space and cut the paper slightly smaller along each edge.
To hold the paper in place, I used double stick tape on each corner and placed the paper where I wanted it in the cabinet.
The reason that I left space on each edge of the wrapping paper was so that I could seal it with clear contact paper. I started at one end and covered the entire space with the contact paper to hold everything in place and prevent the paper from ripping.
 Making a space pretty isn’t essential for the functionality of a space, but I believe there should be a balance of aesthetic and function in all areas of your home.
Step 5: Rebuild the Space
Next I gathered the supplies for rebuilding my space. For my project, bins were the best option for creating the type of organization system that I wanted. Bins are perfect for containing and grouping smaller items in a large space like my under the sink cabinet. I picked up a variety of bins at TJ Maxx.
I found this clear bin in the clearance section. There was a small piece broken off of the lid, but for me that wasn’t an issue. I only wanted to use the clear container and not the lid.

This was perfect, easy to reach location for holding all of my dishwasher tablets.
I don’t have kids yet so for me this setup works, but if you have kids, you know that leaving these tablets within easy reach can be dangerous. If you plan on storing these tablets like I did, I would recommend adding a child safety lock to your cabinet doors.
I also found these gray plastic bins in a variety of different sizes. I put one behind the clear bin to store my extra dish soaps. I keep a soap dispenser on my counter, so extra soaps aren’t needed frequently and can be stored in the back of this space.
I used a larger gray bin to hold dishtowels and cleaning towels. In the back of this bin I put a wet bag for used dishtowels and cleaning towels that need to be washed. This is a really great solution to keep dirty towels off your counters. Then, when it’s time to wash them, you just grab the whole bag and take it to the laundry room.

On the other side of the cabinet I used two smaller gray bins to hold cleaning supplies for the kitchen. I placed the most used supplies in the front and the less frequently used supplies were put in the back.

All of my extra dish sponges were grouped into a small gray bin.

Since both the towels and the sponges are used frequently, I didn’t want to have one bin be in the back of the cabinet. I had this wire rack already that I previously used for stacking plates in our much smaller apartment kitchen. Since I didn’t need it for plates anymore, I used it here to add a shelf so that I could stack two bins on top of each other.

I had a few extra items that I was able to fit behind the shelf that can be easily accessed by pulling out the towel bin. Between the shelf and the dishwashing tablets, I fit in the box of kitchen trash bags.
Once I was finished, I felt like everything finally had a place. By focusing on the purpose of the space, “Kitchen Cleaning and Maintenance,” I was able to rebuild the space by grouping items in a logical and efficient way.
The key part of rebuilding a space is making it functional. Think of how you will interact with the space. Give every item a defined place and make sure items you need to access frequently are easy to get to. By creating a well-designed system for your space that fits with its purpose, you will prevent the space from becoming disorganized again and cluttered.
Step 6: Use the Space for its Purpose
This kind of seems like a no-brainer step, but it’s important for maintaining organization in your home. Once you have completed an organizational project, you have to use the space for its purpose. More importantly, you have to be intentional about keeping items out of the space that don’t fit into that purpose. Part of maintaining your space is making sure that items that don’t belong in the space don’t just end up there because you can’t find any other place. That’s how things become a mess again!
As you live with the space, you may need to re-evaluate the purpose or change things around and that’s ok! Keep track of things that are working for the space and things that are not working. You can always go back and adjust your space to make it work better for you. The key is to always keep that clear purpose in mind.
I’m so happy with how this cabinet turned out! All of the items that we use frequently are within easy reach and cleaning up the kitchen is a breeze. Now I’m ready to start organizing my other kitchen cabinets!
What’s your next organizing project going to be? It can be big or small. Share your spaces and ideas in the comments!








This has always been an area that is a mess for me. I am going to get bins and see if I can not make my space more useful. Great Ideas!!!
I followed your advise to tackle a messy area of my kitchen under the sink as you showed in your post. I have my trash in there also so your suggestions helped get more in a small space. I have not gotten the pop of color but will look for a contact paper this week. Thanks for all the good ideas.
Posted Pics to face book:
I love the addition of the wrapping paper. What a fun pop of color to add to an otherwise bland space! Thanks for sharing these tips at Merry Monday this week!
Thanks Marie! I love seeing the bright colorful paper whenever I have to open this cabinet now. Sometimes it’s nice to have something fun even if it’s not a functional part of organizing.
Hope you have a great day!
>> Christene