Welcome back to our Kitchen Organization Overhaul! In this series, I’ve been sharing ideas, tips, and projects as we finally get our kitchen organized.
This week, I shared one of the first cabinets that I organized in our kitchen, the cabinet under the kitchen sink. This has always been one of the most difficult spaces for me to keep organized. Now I finally feel like I have an organized space and system in place to maintain it. If you missed that post, just click here to read more — How to Organize Under the Kitchen Sink
Today, I’m excited to share the progress that I’ve made in our kitchen so far. After lots of cleaning, sorting, organizing, and planning, I’ve completed what I’m calling “Phase 1” of the Kitchen Organization Overhaul.

Progress not Perfection
I was a little ambitious when I started this overhaul series. I really wanted to get the entire kitchen cleaned, organized, and under control. I also wanted to do a bunch of DIY projects for the kitchen to get even more organized.

I’ve been working on organizing all of the cabinets and spaces and I’ve finally gotten to the point where everything now has a “home” in the kitchen. I’ve decided which drawers and cabinets certain things belong in and those items have been moved around accordingly.
But, as much as I would love to give you a full “organized kitchen tour,” at this point I’m not finished with everything. Some of the cabinets and drawers are looking great! While others aren’t looking so amazing just yet.

Honestly, as the weeks have gone on during this kitchen overhaul, I was started to get discouraged because I couldn’t “complete” the space. All I could see was the unfinished drawers and cabinets. The whole project felt like it was taking FOREVER!
My goal was to get everything done in one big organizing overhaul. And while it’s great to have plans and goals, sometimes we have to step back in the middle of everything and see the progress that we have made.

It takes time and lots of trial and error to come up with the right solutions for each cabinet and drawer in your kitchen. Some will be easier than others. But that’s ok! You don’t have to have everything perfect all at once.
I know that I can be really hard on myself, especially when it comes to goals that I have. But, I’ve learned that it’s important to give myself some credit for the little by little progress that I’ve made.
Once I took a step back, I realized that I had actually made some great progress! It was just hard to realize when I was so wrapped up in trying to get everything perfectly organized.
So, I wanted to take a little time to encourage you in whatever organizing project you are tackling. It’s important to work towards those big goals, but make sure you see the little improvements that you’re making along the way. This will help you to stay motivated instead of getting discouraged.
And remember, progress, not perfection, is the real goal!
Organized Kitchen Cabinets and Drawers {Part 1}
This post contains affiliate links for your convenience. For more information, see my disclosures here.
With all of that said, I wanted to show you a little bit of my progress in our Kitchen Organization Overhaul.
Let me show you a few of the before and afters and explain exactly what I did to better organize the space.
Coffee Cabinet
This cabinet used to be our cooking and baking ingredients cabinet. It was a little too small for those items, so I decided instead to turn it into a coffee cabinet.

All of our coffee mugs, travel mugs, and other coffee accessories live in this cabinet. I also moved our water heater to the countertop underneath this cabinet. Now we have a coffee station where everything is in one location.
The bottom shelf has our coffee making supplies. There are containers for coffee beans and grounds. We use an Aeropress in our home to make coffee, so that gadget sits on the bottom shelf for easy access.
To make better use of the space in this cabinet, Ben built a wooden shelf that you can see on the second cabinet shelf. It gives us another layer for mugs so we can fit more into the vertical space that we have. It also has a grid area to house our travel coffee mugs.
Paper Goods Drawer
This drawer used to be our spice drawer. It was also starting to become too small for our needs, so I decided to move switch the spice drawer with the paper goods drawer.

Paper goods is a term I’m using to cover things like cling wrap, tin foil, ziplock bags, straws, and more. All of these items fit nicely into a drawer because you can lay them down.

Spice Drawer
This drawer used to be our paper goods drawer. It was such a large space, that I decided instead to make it into our spice drawer.

I love storing spices in a drawer. It makes it so much easier to find exactly what you need. Previously, I just had the spices laying in the open drawer. They didn’t always stay the most organized.
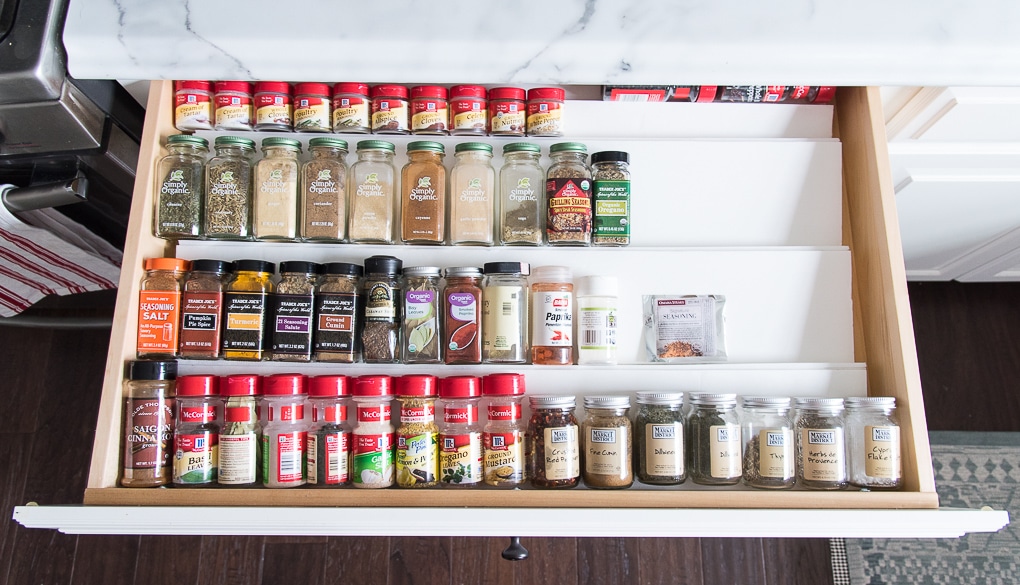
For this drawer, I decided to make my own spice drawer organizer using this tutorial from Kathryn at Do It On a Dime. All you need is a foam board from the Dollar Tree and some hot glue. It’s so easy and inexpensive. So go check out her YouTube channel and learn how to make one of these for your drawer too!
Baking Pans Cabinet
This cabinet used to be a miscellaneous cabinet. We had a few serving bowls in there and some random things on the bottom shelf.

I decided to turn this into a baking pans cabinet. I have a few different baking pans that I don’t use very often, but I still want to have easy access to. So, on the top pull-out shelf, I have things like circle cake pans and bread pans.
Then, on the bottom shelf, I used an extendible organizer from IKEA to create slots so that I could store my other pans upright. You can see that I have muffin tins in a few different sizes and a wire cooling rack.
Cooking and Baking Prep Cabinet
This cabinet didn’t change its function, but it did get an organized makeover. This is the cabinet inside of our island that houses all the cooking and prep tools. Things like mixing bowls, cutting boards were in this cabinet. But, in the bottom, I had a bunch of random items that didn’t belong.

So, when I organized this cabinet, I decided to keep all of the bowls and cutting boards, but I swapped out the random items for all of my baking dishes. Now I have easy access to all of my big cooking and prep items in one location.
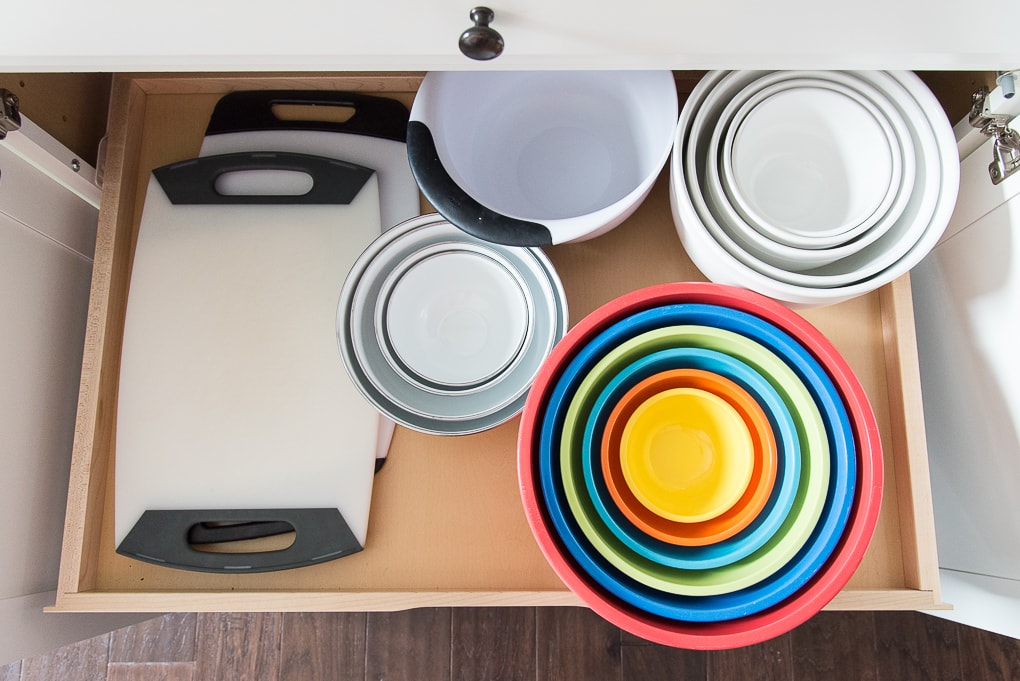
You might notice in the before photo that there was a pull-out shelf in the middle of the cabinet, but the bottom was kind of a dumping zone. Well, we decided to relocate one of the pull-out shelves from another cabinet of the same size in our kitchen to the bottom of this cabinet.

Now, I have two pull out shelves, which makes accessing items and keeping everything organized much easier.
Pantry Cabinet 1 — Cooking & Baking Ingredients
This cabinet has always served as a “pantry” cabinet in our kitchen. But, as you can see it was becoming really messy! There weren’t any systems in place, so we would just put food items wherever they fit.

This cabinet is now our cooking and baking ingredients cabinet. The bottom shelf on the left holds all of our cooking oils on a turntable for easy access. No more pushing through tons of items to get that one cooking oil that I’m looking for. The turntable has been a big improvement in our cabinet.
The bottom shelf on the right holds baking ingredients like flours and sugars.
The next shelf up was actually adjusted to be just large enough to fit our largest measuring items. I keep the measuring tools as well as other prep tools like small bowls and a cheese grater.
On the next shelf up, we have storage for larger containers. Things like olive oil, breadcrumbs, and other baking items fit nicely here. On the right side, I even used a 3-tiered riser shelf to hold smaller items. It allows me easily access items in the back of the cabinet.
On the top shelf, I used simple white bins from the Container Store (similar) to hold extra items. The bin on the left holds extra flours and sugars in case we run out. The other two bins have baking tools and ingredients that we use less often.
Pantry Cabinet 2 — Pantry Staples
This cabinet used to house all of our coffee station supplies. As you can see, I wasn’t really making the best use of this space. It’s a very large cabinet and I was definitely not using it to the full potential.

I decided to turn this into a pantry staples cabinet. I adjusted the bottom shelf to be just tall enough for a standard height can. Then, on the next shelf, I used a wire shelf to maximize the vertical space and store more cans for easy access.
We always keep certain staple foods on hand. Things like black beans, salsas, diced tomatoes, chicken broth, pasta sauces, and dressings are all so helpful to always have in your pantry.
The third shelf has taller items like sauces and dressings. I also used a spice packet organizer here to hold dressing mixes and other packet items.
On the top shelf, I used simple white bins from the Container Store (similar) to hold extra items. These bins hold extra dry goods and pantry staples.
I’m really excited to continue organizing our kitchen. There are still many cabinets and drawers to finish, but I’m glad to have made some significant progress so far.
Let me know in the comments which organizing idea from my kitchen is your favorite.
Have a great week!
Kitchen Organization Overhaul
How to Get Organized When You Are Overwhelmed
How to Plan a Kitchen Organization Overhaul in 3 Easy Steps
7 Things You Need to Get Rid of When Organizing Your Kitchen
How to Organize Under the Kitchen Sink
Organized Kitchen Cabinets and Drawers {Part 1} (You’re here)




All I can say s, this is absolutely gorgeous. With the two that I live with, the two that NEVER put ANYTHING back in its place would NEVER. Work in our home. I would be spending 100% of the time re-strengthen things. If I lived along, or no male in the house, then this would for sure work in our home. Thank you for sharing this beautiful organizational
I love that you are commending yourself on small achieved goals. I am trying to de-clutter my entire house. Like your first step, overwhelmed doesn’t even begin to express all of what I was (and still am) to a degree. I did confirm that i have already taken a few of your tips to heart. I was on a mission for bins or something that would allow me to “organize” everything in a week. I never found it. I have stopped to give myself some much needed appreciation for trying to de-clutter and organize. Purging was and still is the most difficult step. Like you mentioned several times, if you don’t use it. Then it is of no benefit. I have a question. I have the remnants of what was a lazy susan in a corner cabinet. The “lazy susan” was very generic and was not an industrial grade version, so it never worked for what it was. Now i am left with a “V” shaped cabinet door and a make shift storage area that has become a catch all with no way to organize it. Can you offer any advice?? Thanks for your steps and support!
Do you have a post Part 2 for kitchen organizing?