Looking to cozy up your home for fall? These 5 DIY fall decor projects can be completed in under an hour and will give your space an affordable, seasonal refresh.
Quick DIY Fall Crafts
Fall is the perfect season to cozy up your home with warm, inviting touches.
But between juggling kids, running errands, and everything else on your to-do list, finding time to decorate can feel impossible.

That’s why I’m all about quick and easy DIY projects that you can finish in under an hour!
Yes, it’s possible to add that perfect fall touch to your home, even if you’re short on time.
Here are 5 DIY fall decor projects that are not only budget-friendly but also quick and easy to make.
These simple projects will have your home feeling fall-ready in no time, without taking up your entire afternoon.

This post contains affiliate links for your convenience. For more information, see my disclosures here.
Easy Fall Decor Projects
1. Mason Jar Candle Holders with Fall Leaves
Mason jars are a DIY decor staple for good reason—they’re versatile, affordable, and can be transformed into beautiful fall decorations in no time.

For this project, we’re creating glowing candle holders with a fall-inspired twist.
What You’ll Need:
- Mason jars (any size)
- Mod Podge
- Faux fall leaves or real fall leaves
- Sponge brush
- Tea light candles (real or LED)
SHOP

How to Make It:
1. Prep Your Jar: Clean the mason jars to remove any dust or dirt. Dry thoroughly.
2. Apply the Leaves: Using a sponge brush, coat one side of a leaf with Mod Podge and press it onto the outside of the jar. Repeat with additional leaves, arranging them as you like.
3. Seal the Leaves: Once the leaves are arranged, brush another layer of Mod Podge over the entire jar to seal everything in place. Don’t worry if it looks white—it will dry clear!
4. Let Dry: Let the jar dry for about 20 minutes.

5. Add a Candle: Place a tea light candle inside, and watch your new fall candle holder glow!
Quick Tip: You can customize this project further by adding twine around the top of the jar or even using metallic paint on the leaves for a shimmery effect.
2. DIY Pumpkin Vase
Pumpkins are a fall decor must-have, but why not give them a creative twist?
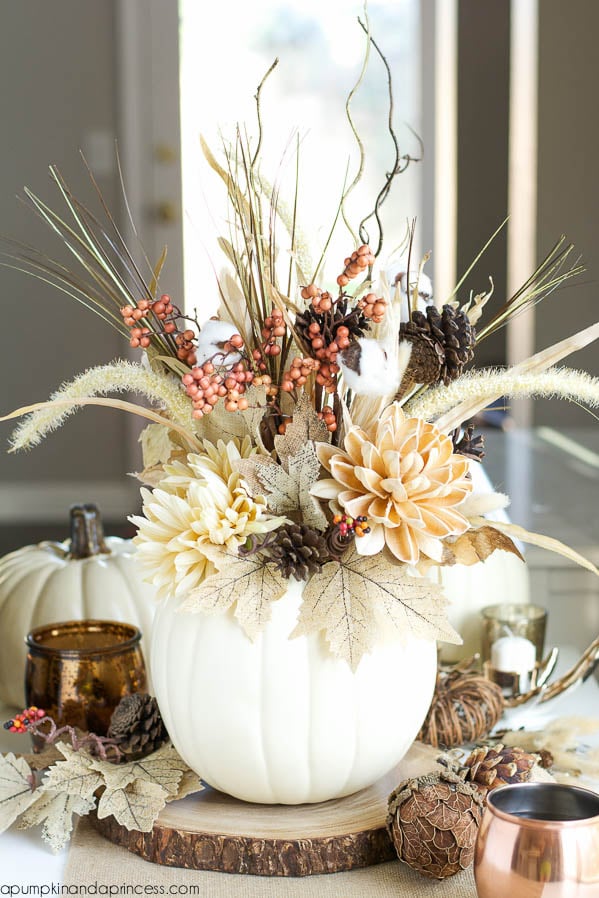
This DIY pumpkin vase can be filled with fall flowers or even dried branches to make a beautiful centerpiece for your table or mantel.
The best part? You can use a real pumpkin or a faux one to make this vase last all season.
What You’ll Need:
- Small to medium pumpkin (real or faux)
- Floral foam (for faux flowers) or a small glass vase (for real flowers)
- Fall flowers, branches, or foliage
- Knife or carving tool (for real pumpkins)
SHOP
How to Make It:
1. Prep the Pumpkin: If using a real pumpkin, carefully cut off the top and scoop out the insides. For a faux pumpkin, cut a hole in the top large enough to fit your floral foam or small vase.
2. Add the Vase or Floral Foam: Place the small vase inside the pumpkin if you’re using real flowers. If you’re using faux flowers, place the floral foam inside.
3. Arrange the Flowers: Fill the vase with water (if using real flowers) and start arranging your fall blooms, branches, or foliage. For faux flowers, simply stick the stems into the floral foam until you have your desired look.
4. Display: Place your pumpkin vase on a dining table, entryway table, or mantel for a pop of fall color!
Quick Tip: Use faux pumpkins and flowers so you can reuse this DIY project year after year.
3. Fall Leaf Garland
Bring a bit of nature into your home with this easy DIY fall leaf garland.
This project is so simple but adds a big impact to your decor.

You can hang the garland on your mantel, along a staircase railing, or across a doorway for a festive touch.
What You’ll Need:
- Faux fall leaves, real leaves, or paper leaves
- Twine or string
- Hot glue gun
SHOP
How to Make It:
1. Prepare the Leaves: If you’re using real leaves, dry them between sheets of wax paper and a heavy book for a few days before starting the project.
2. Attach the Leaves: Using a hot glue gun, attach the leaves to a long piece of twine or string, spacing them evenly. If you’re using faux leaves, you can hole punch the top of each leaf and thread the twine through.
3. Hang the Garland: Once all the leaves are attached, hang your garland wherever you want a touch of fall! Adjust the leaves as needed for a balanced look.
Quick Tip: For extra flair, add small pinecones or mini pumpkins between the leaves along the garland.
4. Burlap Fall Wreath
There’s nothing quite as welcoming as a beautiful fall wreath on your front door, and this DIY burlap wreath is simple, quick, and budget-friendly.

The rustic look of burlap paired with fall accents like pumpkins and leaves creates the perfect fall greeting for your guests.
What You’ll Need:
- Wire wreath form (can be found at craft stores)
- Burlap ribbon or strips of burlap fabric
- Faux fall leaves, mini pumpkins, pinecones, etc.
- Hot glue gun
SHOP
How to Make It:
1. Wrap the Wreath Form: Take the burlap ribbon or fabric strips and wrap them around the wire wreath form. Continue wrapping until the entire form is covered, then secure the end with hot glue.
2. Add Fall Decorations: Hot glue faux leaves, mini pumpkins, pinecones, or any other fall accents to the wreath, arranging them in clusters for a full, balanced look.
3. Hang the Wreath: Once the glue has dried, hang your wreath on your front door, above your mantel, or even on an interior wall for a warm fall welcome.
Quick Tip: Switch up the accents for each season, reusing the same burlap wreath base year-round!
5. Painted Wood Slice Coasters
If you’re looking for a DIY project that’s both functional and decorative, these painted wood slice coasters are perfect for fall.

Not only do they add a rustic touch to your coffee table, but they’re also easy to make in under an hour.
What You’ll Need:
- Wood slices (pre-cut or DIY from fallen branches)
- Acrylic paint (in fall colors)
- Small paintbrushes
- Clear sealant (optional)
SHOP
How to Make It:
1. Paint the Wood Slices: Using fall-colored acrylic paint, add simple designs to your wood slices. You can paint fall leaves, pumpkins, or even just simple stripes or polka dots.
2. Let Dry: Allow the paint to fully dry before handling. If you want to protect the design, you can seal the coasters with a clear sealant.
3. Use and Enjoy: Once dry, your coasters are ready to use! They’ll add some fall charm to your living room while also protecting your furniture from those hot mugs of cider or cocoa.
Quick Tip: Add a set of these coasters to a basket with hot cocoa mix or tea for a fun fall gift idea!
Final Thoughts: Quick, Easy, and Cozy Fall DIYs
Creating fall decor doesn’t have to be time-consuming or expensive.
These quick DIY projects are perfect for any busy mom who wants to add a cozy, seasonal touch to their home.

From candle holders to wreaths, these simple ideas will help you embrace the fall season and make your home feel warm and inviting.
The best part? All of these projects can be completed in under an hour, leaving you with more time to enjoy everything else you love about fall!